SoCompiler Developer Guide
SoCompiler is a desktop app for managing contacts and module information, optimized for use via a Command Line Interface (CLI) while still having the benefits of a Graphical User Interface (GUI). It is built specifically for School of Computing (SOC) students in NUS but can also be used by other students from NUS.
This developer guide will expose the architecture behind SoCompiler and showcase the specifics of how commands are handled by the application.
In order to be a successful SoCompiler Developer, you need a general understanding of:
- Java language
- JavaFx
Table of Contents
- Getting Started
- Design
- Implementation
- Documentation, Logging, Testing, Configuration and Dev-Ops
- Acknowledgements: Requirements
- Appendix A: Requirements
- Appendix B: Instructions for Manual Testing
1. Getting started
Refer to the guide Setting up and getting started.
2. Design
SoCompiler aims to provide features that are intuitive and simple to use. Keeping this in mind, we pursed an iterative approach, adding new features amidst evolving requirements. This gives rise to the following main guiding principles for SoCompiler:
Maintainability
This project is built upon an application called AddressBook Level 3 (AB3), which follows the Model View Controller(MVC) design pattern. Ab3 was developed in a manner that facilitates easy modification. We capitalised on this fact and built upon existing components in AB3, such as UI, Logic, Model and Storage.
Command Line Interface (CLI) Oriented
As our target audience is SOC students who usually type fast and are familiar with command line interfaces, we designed SoCompiler to be more efficient at managing contacts and module information using commands compared to other apps in the market.
.puml files used to create diagrams in this document can be found in
the diagrams folder. Refer to the PlantUML
Tutorial at se-edu/guides to learn how to create and edit
diagrams.
2.1. Architecture

The Architecture Diagram given above explains the high-level design of the App.
Given below is a quick overview of main components and how they interact with each other.
Main components of the architecture
Main has two classes
called Main
and MainApp.
It is responsible for,
- At app launch: Initializes the components in the correct sequence, and connects them up with each other.
- At shut down: Shuts down the components and invokes cleanup methods where necessary.
Commons represents a collection of classes used by multiple other components.
The rest of the App consists of four components.
-
UI: The User Interface (UI) of the App. -
Logic: The command executor. -
Model: Holds the data of the App in memory. -
Storage: Reads data from, and writes data to, the hard disk.
How the architecture components interact with each other
The Sequence Diagram below shows how the components interact with each other for the scenario where the user issues
the command delete 1.

Each of the four main components (also shown in the diagram above),
- defines its Application Programming Interface (API) in an
interfacewith the same name as the Component. - implements its functionality using a concrete
{Component Name}Managerclass (which follows the corresponding APIinterfacementioned in the previous point.
For example, the Logic component defines its API in the Logic.java interface and implements its functionality using
the LogicManager.java class which follows the Logic interface. Other components interact with a given component
through its interface rather than the concrete class (reason: to prevent outside component’s being coupled to the
implementation of a component), as illustrated in the (partial) class diagram below.

The sections below give more details of each component.
2.2. UI component
API : Ui.java

The UI consists of a MainWindow that is made up of parts e.g.CommandBox, ResultDisplay, PersonListPanel
, StatusBarFooter etc. All these, including the MainWindow, inherit from the abstract UiPart class which captures
the commonalities between classes that represent parts of the visible GUI.
The UI component uses the JavaFx UI framework. The layout of these UI parts are defined in matching .fxml files that
are in the src/main/resources/view folder. For example, the layout of
the MainWindow
is specified
in MainWindow.fxml
The UI component,
- executes user commands using the
Logiccomponent. - listens for changes to
Modeldata so that the UI can be updated with the modified data. - keeps a reference to the
Logiccomponent, because theUIrelies on theLogicto execute commands. - depends on some classes in the
Modelcomponent, as it displaysPersonobject residing in theModel.
2.3. Logic component
API : Logic.java
Here’s a (partial) class diagram of the Logic component:

How the Logic component works:
- When
Logicis called upon to execute a command, it uses theAddressBookParserclass to parse the user command. - This results in a
Commandobject (more precisely, an object of one of its subclasses e.g.,AddCommand) which is executed by theLogicManager. - The command can communicate with the
Modelwhen it is executed (e.g. to add a person). - The result of the command execution is encapsulated as a
CommandResultobject which is returned back fromLogic.
The Sequence Diagram below illustrates the interactions within the Logic component for the execute("delete 1") API
call.

DeleteCommandParser should end at the destroy marker (X) but due to a limitation of PlantUML, the lifeline reaches the end of diagram.
Here are the other classes in Logic (omitted from the class diagram above) that are used for parsing a user command:

How the parsing works:
- When called upon to parse a user command, the
AddressBookParserclass creates anXYZCommandParser(XYZis a placeholder for the specific command name e.g.,AddCommandParser) which uses the other classes shown above to parse the user command and create aXYZCommandobject (e.g.,AddCommand) which theAddressBookParserreturns back as aCommandobject. - All
XYZCommandParserclasses (e.g.,AddCommandParser,DeleteCommandParser, …) inherit from theParserinterface so that they can be treated similarly where possible e.g, during testing.
2.4. Model component
API : Model.java

The Model component,
- stores the address book data i.e., all
PersonorModuleobjects (which are contained in aUniquePersonListor aUniqueModuleListobject respectively). - stores the currently ‘selected’
PersonorModuleobjects (e.g., results of a search query) as a separate _ filtered_ list which is exposed to outsiders as an unmodifiableObservableList<Person>orObservableList<Module>that can be ‘observed’ e.g. the UI can be bound to this list so that the UI automatically updates when the data in the list change. - stores a
UserPrefobject that represents the user’s preferences. This is exposed to the outside as aReadOnlyUserPrefobjects. - does not depend on any of the other three components (as the
Modelrepresents data entities of the domain, they should make sense on their own without depending on other components)
2.5. Storage component
API : Storage.java

The Storage component,
- can save both address book data and user preference data in json format, and read them back into corresponding objects.
- inherits from both
AddressBookStorageandUserPrefStorage, which means it can be treated as either one (if only the functionality of only one is needed). - depends on some classes in the
Modelcomponent (because theStoragecomponent’s job is to save/retrieve objects that belong to theModel)
2.6. Common classes
Classes used by multiple components are in the seedu.addressbook.commons package.
3. Implementation
This section describes some noteworthy details on how certain features are implemented.
3.1. Module Class
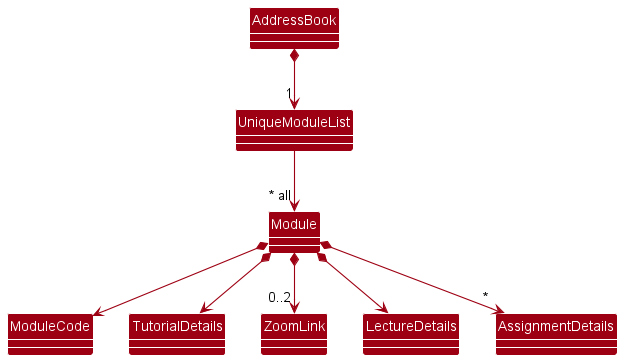
The Module Class
facilitates the storing of various information related to a student’s module that he/she is currently taking.
A Module Class contains
- A
ModuleCode TutorialDetailsLectureDetails- A lecture
ZoomLink - A tutorial
ZoomLink AssignmentDetails
All fields except ModuleCode are optional since not every Module will have details for every field. Empty fields are
represented by empty strings. Users can later modify the fields using the EditCommand.
All the commands associated with the Module Class would have the keyword “Module” in their class name. For example,
the command to add a Module is referred to as a AddModuleCommand.
All the Module objects are contained in a UniqueModuleList object which ensures that no duplicate Module objects
can exist in the UniqueModuleList object. This is because
in NUS, there are no two modules with the same module code. Thus, the notion of equality is defined by default to be
two Module objects containing the same ModuleCode object.
All the classes contained within the Module Class all have a regex that checks for whether the user input for the
specific field is valid.
For the five classes,
- The
ModuleCodeshould only contain alphanumeric characters and spaces, and it should not be blank. - The
ZoomLinkshould be either blank, or a valid URL. -
AssignmentDetailsshould not be blank if added.
3.2. Add Module feature
The AddModule commands extends Command, and takes in a moduleCode, lectureDetails, tutorialDetails, zoomLink
and multiple optional assignmentDetails to be added. Additionally, it implements the following operation:
-
AddModuleCommand#execute()— Adds the corresponding module to the model.
This operation is exposed in the Model interface as Model#addModule().
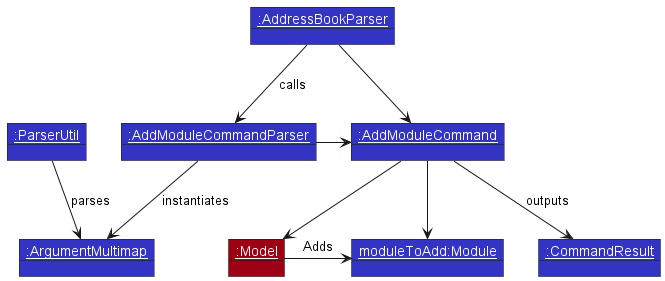
Given below is an example usage scenario, and an object diagram to show the objects created during this command.
Step 1. The user launches the application. The ReadOnlyAddressBook will be initialized with the initial address book
state.
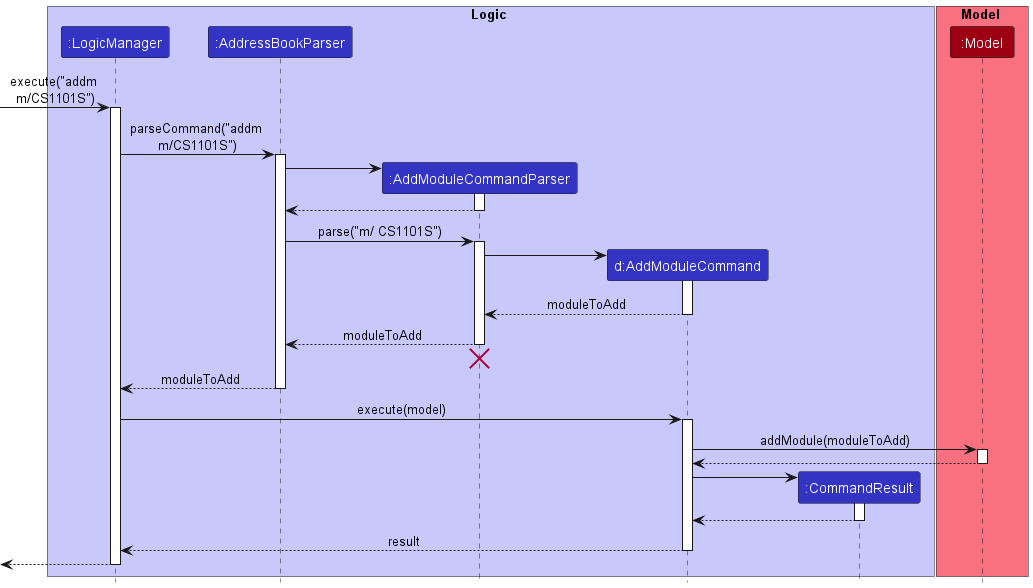
Step 2. The user executes addm m/CS1101S command to add a module with the corresponding details in the address book.
- The
addmcommand callsAddressBookParser#parseCommand(), which creates aAddModuleCommandParser. - The
AddModuleCommandParserthen tokenizes the user input string and returns anArgumentMultimapobject that maps prefixes to their respective argument values. - Methods in
ParserUtilis are then called to parse each individual object obtained from theArgumentMultimapusing their corresponding parsers. - Then, a new
Modulewith the corresponding details is created. - After creating the
Module, anAddModuleCommandis created, which callsModel#addModule(), and adds the newly created module to the model object.
The following object diagram illustrates the above example:
The following sequence diagram shows how the AddModule operation works:
3.3. Delete Module feature
The DeleteModule commands extends Command, and takes in an Index to be deleted. Additionally, it implements the following operation:
-
DeleteModuleCommand#execute()— Deletes the corresponding item in the given model according to the given index.
This operation is exposed in the Model interface as Model#deleteModule().
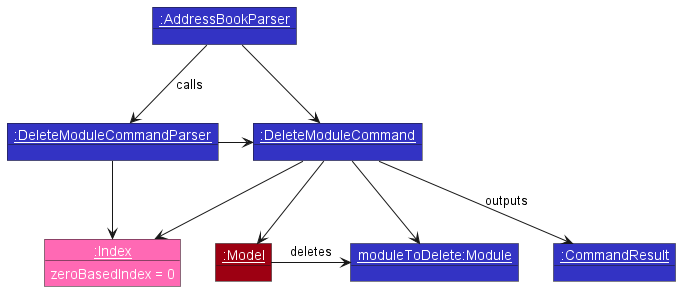
Given below is an example usage scenario, and an object diagram to show the objects created during this command.
Step 1. The user launches the application. The ReadOnlyAddressBook will be initialized with the initial address book state.
Step 2. The user executes deletem 1 command to delete the 1st module in the address book.
- The
deletemcommand callsAddressBookParser#parseCommand(), which creates aDeleteModuleCommandParser. - The
DeleteModuleCommandParsergets theIndexto be deleted, which is 1 in this case, and creates aDeleteModuleCommand. -
DeleteModuleCommandthen callsModel#deleteModule(), and deletes the module from the model object corresponding to the number parsed.
The following object diagram illustrates the above example:
The following sequence diagram shows how the DeleteModule operation works:
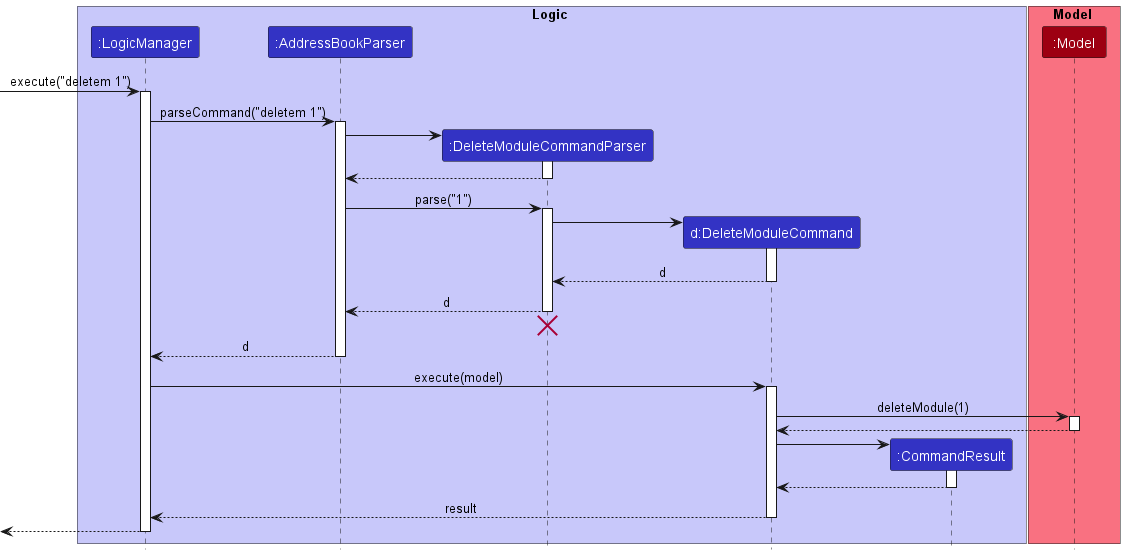
DeleteModuleCommandParser should end at the destroy marker (X) but due to a limitation of PlantUML, the lifeline reaches the end of diagram.
3.4. Find Module feature
The FindModule command extends Command, and takes in an ModuleDetailsContainsKeywordsPredicate to filter the module list by. Additionally, it implements the following operation:
FindModuleCommand#execute()
This operation is exposed in the Model interface as Model#updateFilteredModuleList().
Given below is an example usage scenario.
Step 1. The user launches the application. The ReadOnlyAddressBook will be initialized with the initial address book state.
Step 2. The user executes findm CS2100 command to filter the module list by CS2100.
- The
findm CS2100command callsAddressBookParser#parseCommand(), which creates aFindModuleCommandParser. - The
FindModuleCommandParserinstantiates aModuleDetailsContainsKeywordsPredicatewith the given keywordCS2100. - The
FindModuleCommandParserthen creates aFindModuleCommandwith the keyword. - The
FindModuleCommandthen callsModel#updateFilteredModuleList()and filter the list to contain only Modules with the given keyword in their module code.
The following sequence diagram shows how the FindModule operation works:
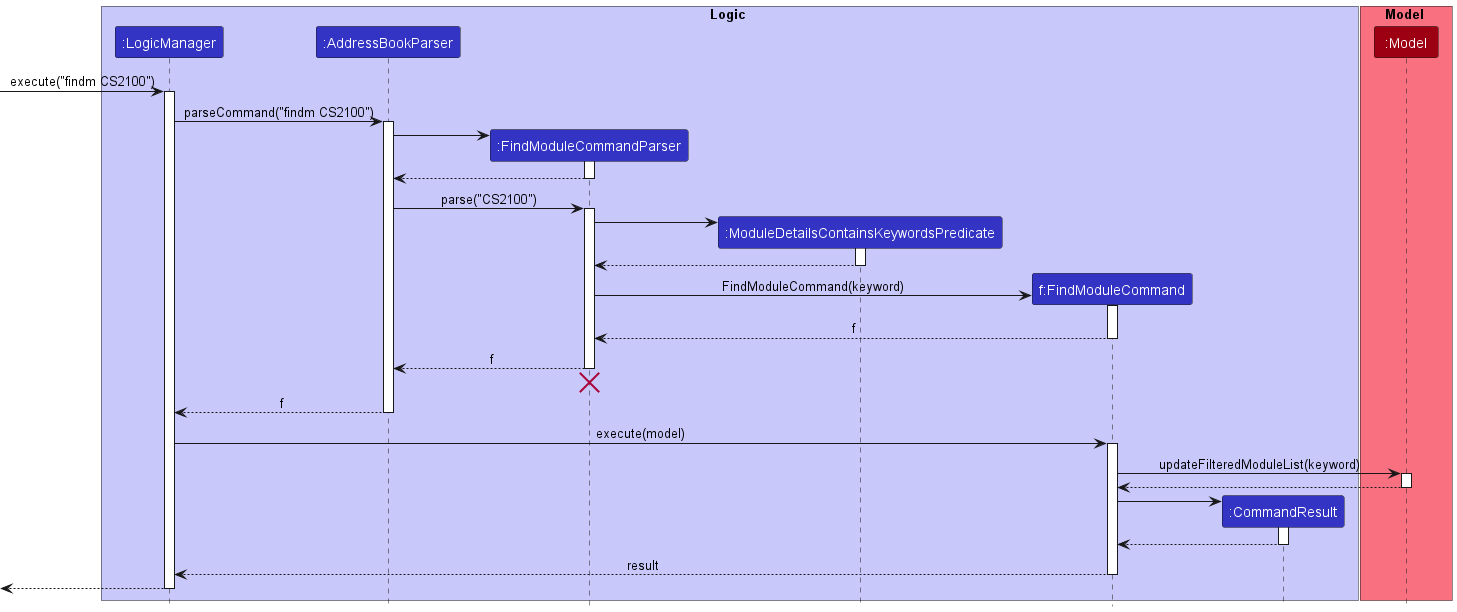
FindModuleCommandParser should end at the destroy marker (X) but due to a limitation of PlantUML, the lifeline reaches the end of diagram.
4. Documentation, logging, testing, configuration, dev-ops
5. Acknowledgements
SoCompiler is built-upon AddressBook-Level3, a sample project that serves as a base for Computer Science students to work on.
Credit for code adapted/materials obtained from external sources
- Code to read a file from resources folder is adapted from this thread on mkyong.com
- Font used for the GUI were obtained from Google Fonts, where all fonts are under open source licenses and can be used in commercial and non-commercial products.
6. Appendix A: Requirements
6.1. Product scope
Target user profile:
- is from SoC
- has a need to manage a significant number of contacts
- has a need to manage the modules they are taking
- prefer desktop apps over other types
- can type fast
- prefers typing to mouse interactions
- is reasonably comfortable using CLI apps
Value proposition: Sole app that SoC students need to streamline their everyday routines
6.2. User stories
Priorities: High (must have) - * * *, Medium (nice to have) - * *, Low (unlikely to have) - *
| Priority | As a … | I want to … | So that I can… |
|---|---|---|---|
* * * |
SoC Student | add a module | |
* * * |
SoC Student | add a new person | |
* * * |
SoC Student | delete a person | remove entries that I no longer need |
* * * |
SoC Student | delete a module | remove entries that I no longer need |
* * * |
SoC Student | add zoom links for my modules | |
* * * |
SoC Student | delete zoom links | remove entries that I no longer need |
* * * |
SoC Student | easily find my zoom links | not spend too much time finding them on various websites |
* * * |
SoC Student | find a module and the specifics of the module | not spend too much time finding information on various websites |
* * * |
SoC Student | add the deadline of my assignments for each module | easily keep track of my deadlines |
* * * |
SoC Student | find a contact easily | not spend too much time looking for contacts |
* * |
SoC Student | check my schedule for the day | plan ahead |
* * |
SoC Student | organise consultations easily | not need to search various websites to organise consultations |
* * |
SoC Student | label my contacts | keep track of my project groups |
* * |
SoC Student | organise the deadlines of my assignments | see which deadline is most pressing |
* * |
SoC Student | see the dates of my exams | better prepare for them |
* |
SoC Student | add miscellaneous events | better plan my time |
* |
SoC Student | archive the current information | reset for the new semester |
* |
SoC Student | keep track of my interview dates | make ample preparations |
* |
SoC Student | keep track of my weekly meetings | make preparations for them |
* |
Teaching Assistant | access document links for all my slides | share with the class I am teaching |
* |
Teaching Assistant | manage my student’s consultation slots | easily find the timing for their consultation |
* |
Teaching Assistant | access my module website | grade my student’s submission |
* |
Teaching Assistant | easily group my students’ contacts together | easily find them at once |
6.3. Use Cases
(For all use cases below, the System is the SoCompiler and the Actor is the user, unless specified
otherwise)
Use case:UC1 Add a person
MSS
- User requests to add person
-
SoCompiler adds the person to the list of persons
Use case ends.
Extensions
-
1a. The given person already exists.
-
1a1. SoCompiler shows an error message
Use case ends.
-
-
1b. Necessary fields are empty.
-
1b1. SoCompiler shows an error message
Use case ends.
-
Use case:UC2 Delete a person
MSS
- User requests to list persons
- SoCompiler shows a list of persons
- User requests to delete a specific person in the list
-
SoCompiler deletes the person
Use case ends.
Extensions
-
2a. The list is empty.
Use case ends.
-
3a. The given index is invalid.
-
3a1. SoCompiler shows an error message.
Use case resumes at step 2.
-
Use case:UC3 Add a module
MSS
- User requests to add a module
-
SoCompiler adds the module to the list of modules
Use case ends.
Extensions
-
1a. The given module already exists.
-
1a1. SoCompiler shows an error message
Use case ends.
-
-
1b. Necessary fields are empty.
-
1b1. SoCompiler shows an error message
Use case ends.
-
Use case:UC4 Delete a module
MSS
- User requests to list module
- SoCompiler shows a list of modules
- User requests to delete a specific module in the list
-
SoCompiler deletes the module
Use case ends.
Extensions
-
2a. The list is empty.
Use case ends.
-
3a. The given index is invalid.
-
3a1. SoCompiler shows an error message.
Use case resumes at step 2.
-
Use case:UC5 Find a person
MSS
- User requests to find keyword
-
SoCompiler shows a list of persons matching that keyword
Use case ends.
Use case:UC6 Find a module
MSS
- User requests to find keyword
-
SoCompiler shows a list of modules matching that keyword
Use case ends.
Use case:UC7 Display list of persons
MSS
- User requests to list persons
-
SoCompiler shows a list of persons
Use case ends.
Use case:UC8 Display list of modules
MSS
- User requests to list modules
-
SoCompiler shows a list of modules
Use case ends.
Use case:UC9 Edit entry in list of persons
MSS
- User requests to list persons
- SoCompiler shows a list of persons
- User requests to edit the fields of a specified person in the list
-
SoCompiler edits the fields of the specified person
Use case ends.
Extensions
-
3a. The given index is invalid.
-
3a1. SoCompiler shows an error message
Use case ends.
-
-
3b. No field is provided.
-
3b1. SoCompiler shows an error message
Use case ends.
-
-
3c. The given name already exists.
-
3c1. SoCompiler shows an error message
Use case ends.
-
Use case:UC10 Edit entry in list of modules
MSS
- User requests to list modules
- SoCompiler shows a list of modules
- User requests to edit the fields of a specified module in the list
-
SoCompiler edits the fields of the specified module
Use case ends.
Extensions
-
3a. The given index is invalid.
-
3a1. SoCompiler shows an error message
Use case ends.
-
-
3b. No field is provided.
-
3b1. SoCompiler shows an error message
Use case ends.
-
-
3c. The given module code already exists.
-
3c1. SoCompiler shows an error message
Use case ends.
-
6.4. Non-Functional Requirements
- Should work on any mainstream OS as long as it has Java
11or above installed. - Should be able to hold up to 1000 persons and modules without a noticeable sluggishness in performance for typical usage.
- A user with more than 50 words per minute typing speed for regular English text (i.e. not code, not system admin commands) should be able to accomplish most of the tasks faster using commands than using the mouse.
- The system should be backward compatible with data stored in earlier versions of the system.
- The product is not required to handle interaction with other users.
6.5. Glossary
Command Line Interface (CLI)
It is an interface where users input text commands to interact with the computer/program.
Graphical User Interface (GUI)
It is an interface where users can interact with apps/electrical devices through graphical icons and audio indicators.
School of Computing (SOC)
It refers to the School of Computing from the National University of Singapore.
User Interface
The point of human-computer interaction and communication.
Application Programming Interface
The way for two or more computer programs to communicate with each other.
Mainstream OS:
Operating Systems such as Windows, Linux, Unix, OS-X
Modules:
University modules offered in NUS
7. Appendix B: Instructions for manual testing
Given below are instructions to test the app manually.
7.1. Launch and shutdown
-
Initial launch
-
Download the jar file and copy into an empty folder
-
Double-click the jar file Expected: Shows the GUI with a set of sample contacts. The window size may not be optimum.
-
-
Saving window preferences
-
Resize the window to an optimum size. Move the window to a different location. Close the window.
-
Re-launch the app by double-clicking the jar file.
Expected: The most recent window size and location is retained.
-
7.2. Deleting a person
-
Deleting a person while all persons are being shown
-
Prerequisites: List all persons using the
listcommand. Multiple persons in the list. -
Test case:
delete 1
Expected: First contact is deleted from the list. Details of the deleted contact shown in the status message. Timestamp in the status bar is updated. -
Test case:
delete 0
Expected: No person is deleted. Error details shown in the status message. Status bar remains the same. -
Other incorrect delete commands to try:
delete,delete x,...(where x is larger than the list size)
Expected: Similar to previous.
-
7.3. Saving data
-
Dealing with missing/corrupted data files
- Open the save file
SoCompiler.jsonlocated in the filedataand add garbage values. For example, add!or-to a persons’ contact number. - Re-launch the app by double-clicking the jar file.
Expected: App opens with no person or module loaded. Save file is wiped clean.
- Open the save file