SoCompiler User Guide
The sole app that university students will need to streamline their everyday routines.
SoCompiler is a desktop app for managing contacts and module information, optimized for use via a Command Line Interface (CLI) while still having the benefits of a Graphical User Interface (GUI).
You can add modules to the app, allowing you to store important information like the location, time and zoom links of your lectures and tutorials.
You can also add people to the app, such as your professors, teaching assistants or just friends, allowing you store their email addresses, phone numbers, telegram handles and which modules they are from.
If you are a School of Computing (SOC) student, this app is perfect for you! SoCompiler can get your contact and module management tasks done faster than traditional GUI apps.
Even if you are not, fret not! Just have a quick look at the command summary (they are rather intuitive) and start typing to give it a try!
For first-time users, we also recommend you to first read through the various person fields as well as module fields to familiarise yourself with what each field represent and their constraints.
Table of Contents
Quick start
- Ensure you have Java
11or above installed on your Computer.
- You can get Java 11 from here, make sure to download the correct version for your operating system, and follow their instructions.
-
Download the latest
SoCompiler.jarfrom here. -
Move the downloaded file to the folder you want to use as the home folder for your SoCompiler. For example, you can just move it to your Desktop for ease of access.
-
Double-click the file to start the app. A GUI similar to the one below should appear in a few seconds. Note how the app contains some sample data.

-
Type a command in the command box and press Enter to execute it.
-
Refer to the Command Summary below for details of each command.
The GUI Layout
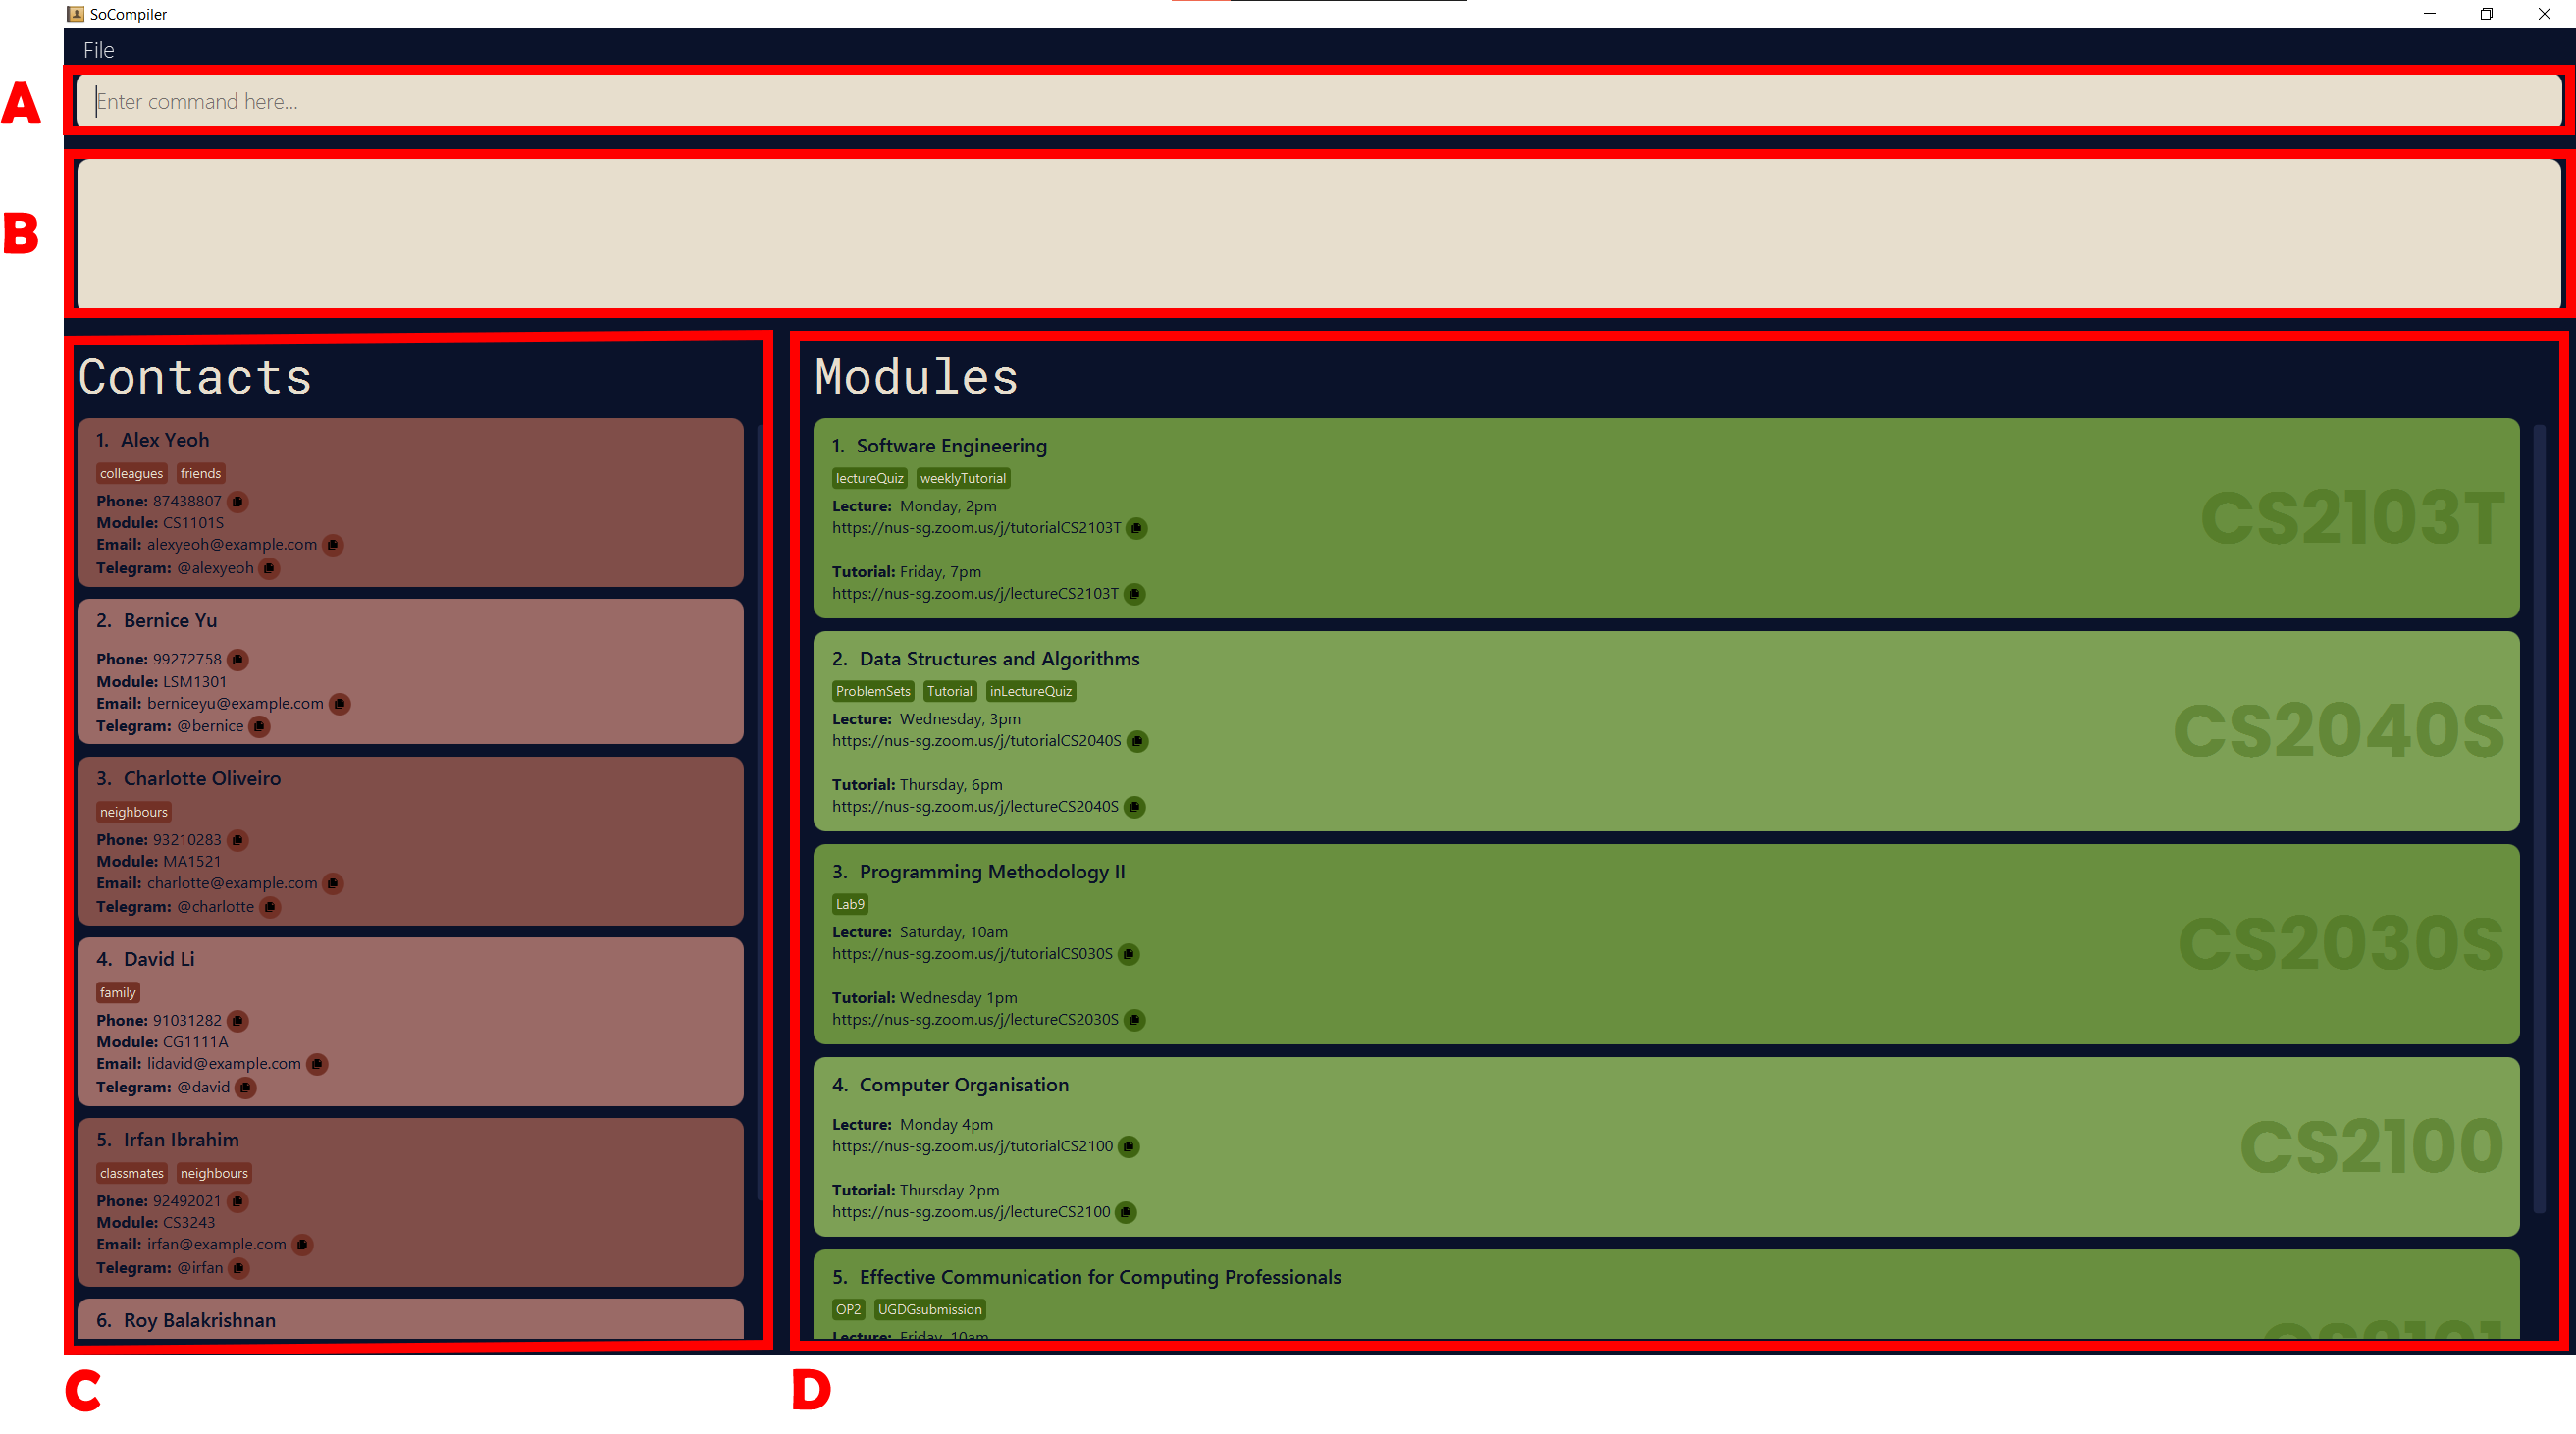
- A: Command input area. This is where you would key in your commands.
- B: Command output area. This is where the feedback of your commands would be displayed
- C: Contact List. This is where all contacts are displayed with their individual fields.
- D: Module List. This is where all modules are displayed with their individual fields.
Things to note
![]() Notes about the command format:
Notes about the command format:
-
Words in
UPPER_CASEare the parameters to be supplied by you.
e.g. for addn/NAME, NAME is the parameter and can be replaced with John Doe. -
Items in square brackets are optional.
e.g.n/NAME [/t TAG]can be used asn/John Doe t/friendor asn/John Doe. -
Parameters after the name and module code can be in any order. e.g.
addp n/NAME p/PHONE_NUMBER e/EMAILis similar toaddp n/NAME e/EMAIL p/PHONE_NUMBER. -
If a parameter is expected only once in the command but is specified multiple times, only the last occurrence of the parameter will be taken.
e.g. if you specifyp/12341234 p/56785678, onlyp/56785678will be taken.
Commands
General Commands
Listing all modules and contacts: list
Displays all modules and contacts stored in the app.
Format: list
Finding keywords in contacts and/or modules: find
Finds modules and contacts with any of the given keywords in any field.
Format: find KEYWORD [MORE_KEYWORDS]…
- The search is NOT case-sensitive; e.g.
cs2030swill matchCS2030S, orCs2030s. - The order of the keywords does not matter; e.g.
Friday 10amwill match10am Friday. - Only full words will be matched; e.g.
Cs2030will not matchCs2030S. - Full words are characterized by having a space before and after the word; e.g. Searching
Fridaywill only matchFridayand notFriday, - Modules matching at least one keyword will be returned; e.g.
Monday Fridaywill return all modules that have lectures or tutorials onMondayorFriday.
Examples:
-
find CS2040Sreturns both the modulecs2040sas well as contacts withcs2040sunder theirmodulefield.
-
find FridayreturnsCS2100andCS2103T, assuming both modules have lectures or tutorials on Friday.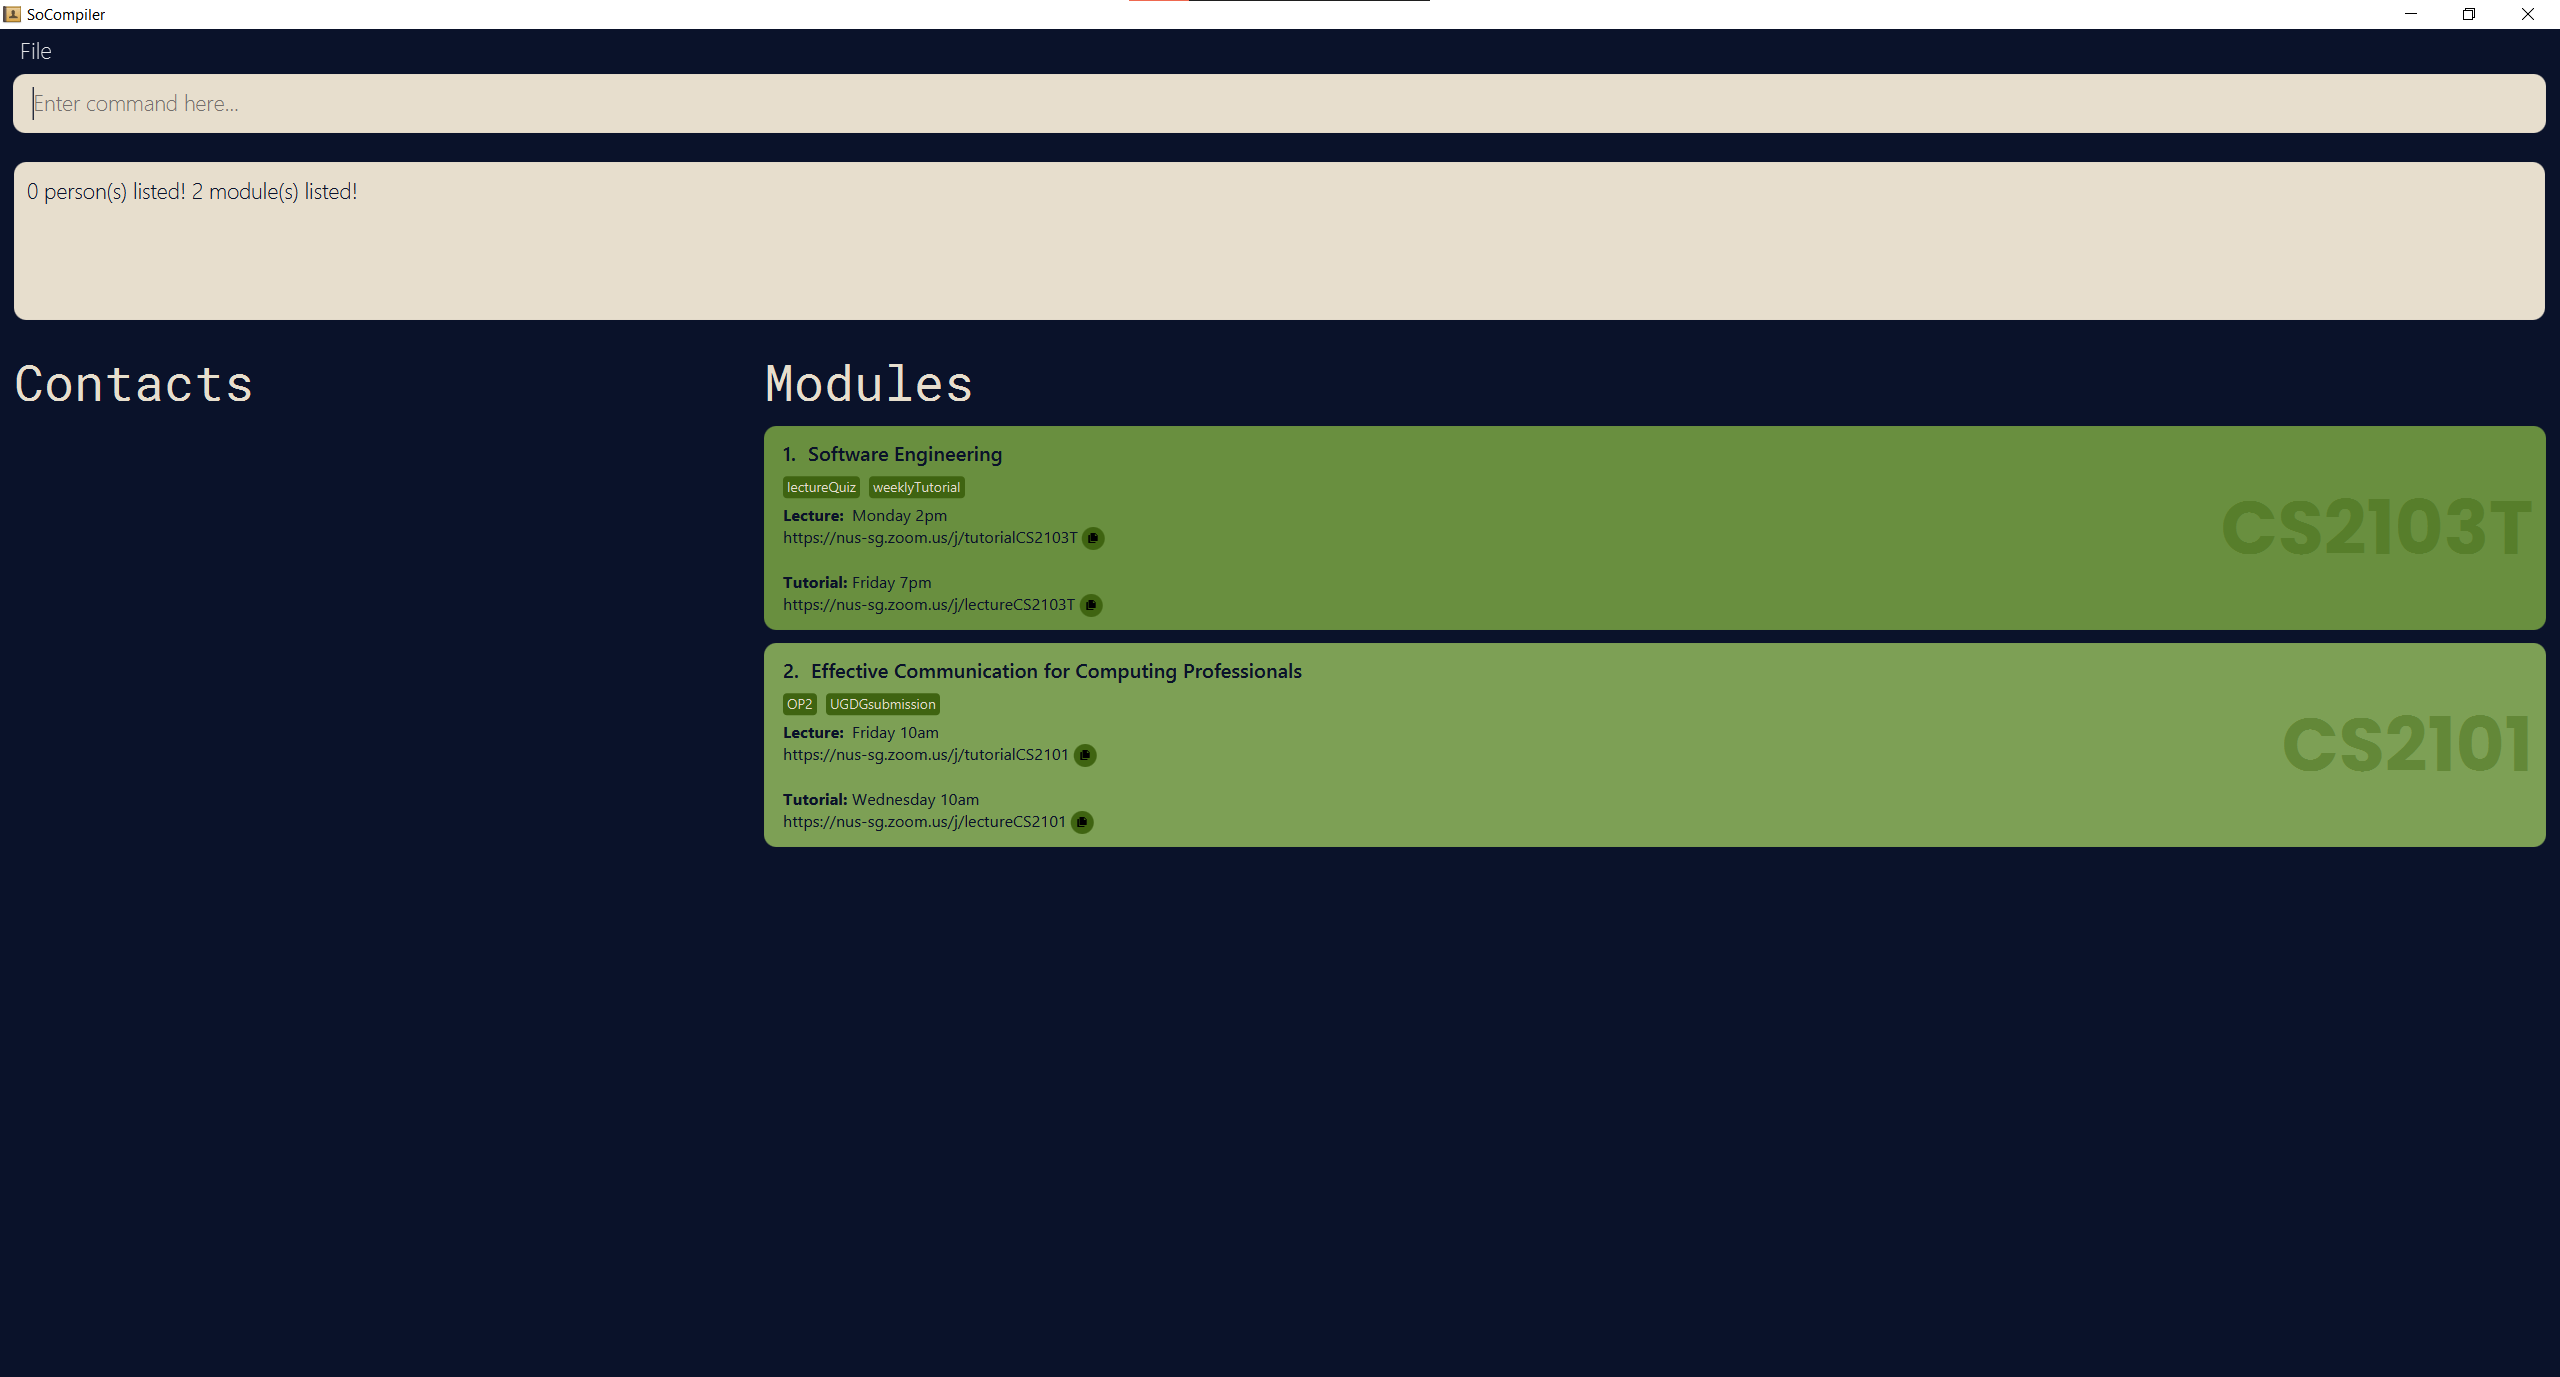
Clearing all contacts and modules: clear
Clears all entries from both the contact and module list.
Format: clear
Looking for help: help
Opens a window that provides a link to the user guide.
Format: help
Exiting the program: exit
Exits the program.
Format: exit
Saving the data
SoCompiler data are saved in the hard disk automatically after any command that changes the data. There is no need to save manually.
Commands for Contacts
Adding a contact: addp
Adds a contact to the contact list.
Format: addp n/NAME [p/PHONE_NUMBER] [e/EMAIL] [tg/TELEGRAM] [m/MODULE_CODE] [t/TAG]…
- The
NAMEfield is mandatory while all other fields are optional (click here for more details on each individual field). If you attempt to add a person without a name, it will result in an error! - A contact can have any number of tags (including 0)
Examples:
addp n/John Doe p/98765432 e/johnd@example.com tg/@johndoe m/CS2040S t/Labmate t/Friendaddp t/Family p/95647581 e/jessie@example.com tg/@jessica n/Jessica Limaddp n/BobMcGhee
Editing a contact: editp
Edits an existing contact in the contact list.
Format: editp INDEX [n/NAME] [p/PHONE] [e/EMAIL] [tg/TELEGRAM] [m/MODULE_CODE] [t/TAG]…
- Edits the contact at the specified
INDEX. The index refers to the index number shown in the displayed contact list. The index must be a positive integer 1, 2, 3, … - At least one of the optional fields must be provided.
- Existing values will be updated to the input values.
- When editing tags, the existing tags of the contact will be removed i.e. adding of tags is not cumulative.
- You can remove all the contact’s tags by typing
t/without specifying any tags after it.
Examples:
-
editp 1 p/91234567 e/johndoe@example.comEdits the phone number and email address of the 1st contact to be91234567andjohndoe@example.comrespectively. -
editp 2 n/Betsy Crower t/Edits the name of the 2nd contact to beBetsy Crowerand clears all existing tags.
Deleting a contact: deletep
Deletes the specified contact from the contact list.
Format: deletep CONTACT_INDEX
- Deletes the contact at the specified
CONTACT_INDEX. - The contact index refers to the index number shown in the displayed contact list.
- The index must be a positive integer 1, 2, 3, …
Examples:
-
findp Betsyfollowed bydeletep 1deletes the 1st contact in the results of thefindpcommand. -
listfollowed bydeletep 5deletes the 5th contact in the address book.
Finding a contact: findp
Find contacts with any of the given keywords in any field.
Format: findp KEYWORD [MORE_KEYWORD]…
- The search is NOT case-sensitive; e.g.
findp alexwill return the contactAlex, orALEX. - The order of the keywords does not matter; e.g.
findp Bob McGheewill return the contactMcGhee Bob. - Only full words will be matched; e.g.
find alewill not return the contactalex. - Full words are characterized by having a space before and after the word; e.g. Searching
Alexwill only matchAlexand notAlex- - Contacts matching at least one keyword will be returned; e.g.
findp mcghee broadwill return the contactsBob McGheeandSeaward Broad.
Examples:
-
findp yeoh yureturns contactsAlex YeohandBernice Yu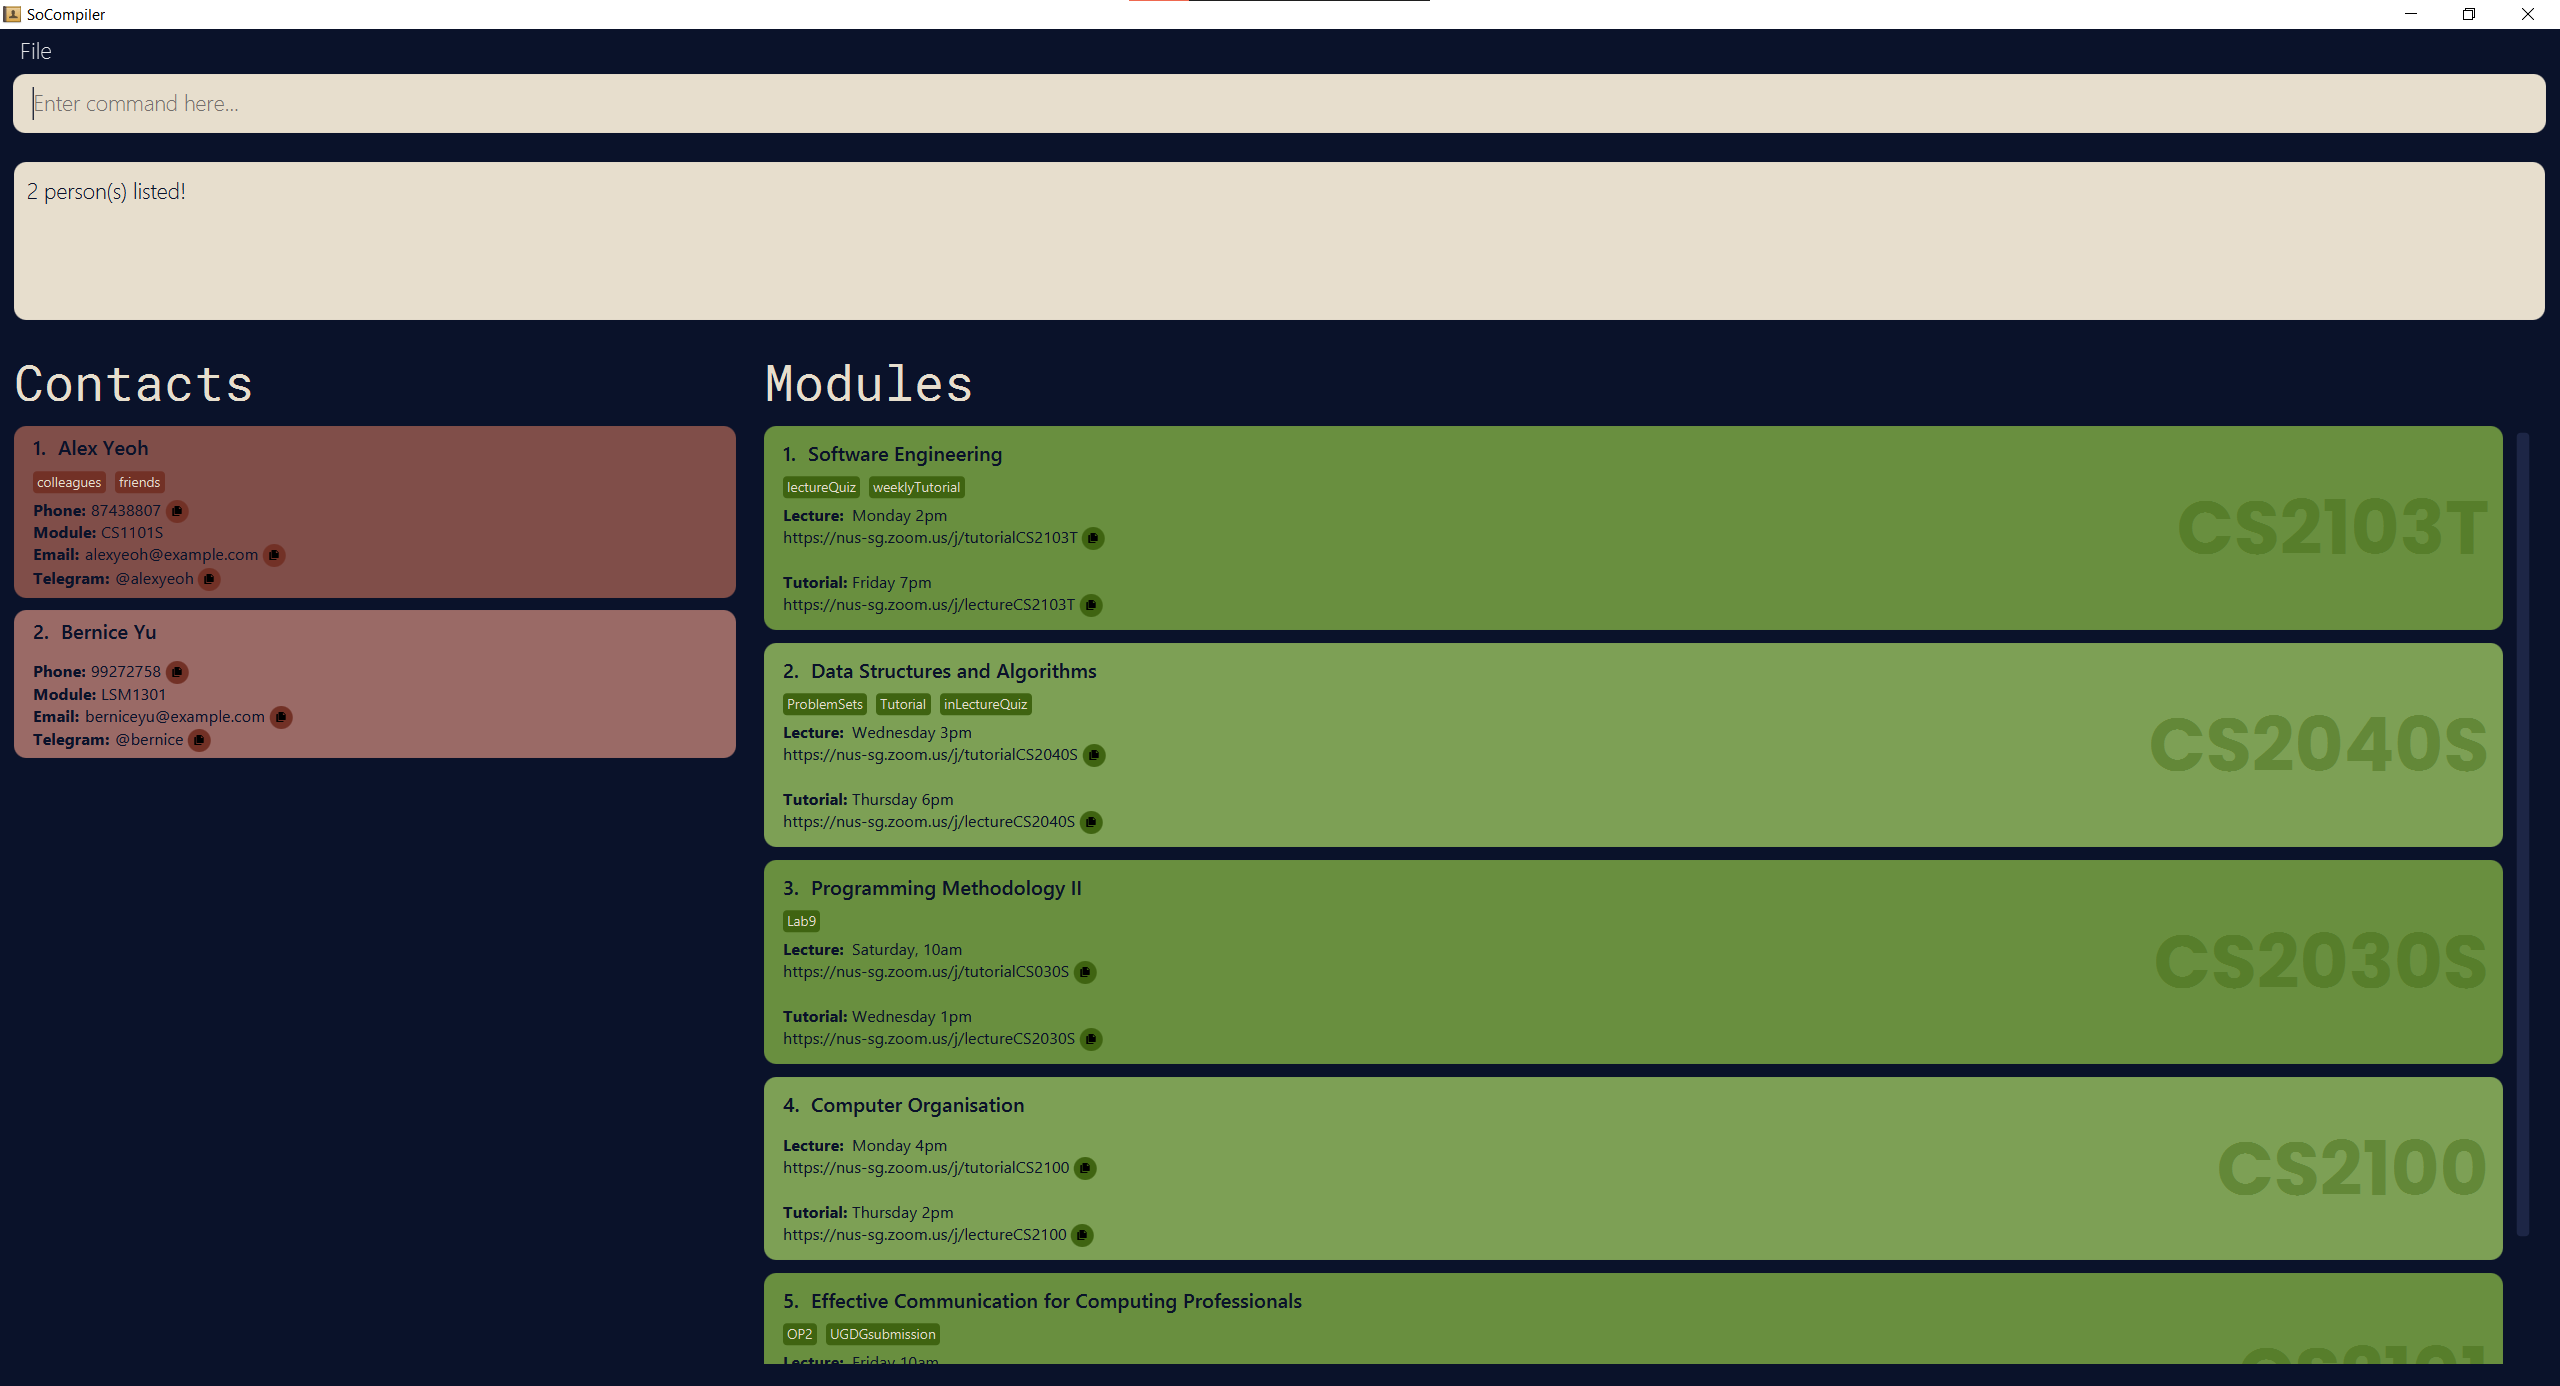
Commands for Modules
Adding a module: addm
Adds a module to the module list.
Format: addm m/MODULE_CODE [l/LECTURE_DETAILS] [t/TUTORIAL_DETAILS] [lz/LECTURE_ZOOM_LINK] [tz/TUTORIAL_ZOOM_LINK] [a/ASSIGNMENT_DETAILS]…
- The
MODULE_CODEfield is mandatory while all other fields are optional (click here for more details on each individual field). If you attempt to add a module without a module code, it will result in an error! - A module can have any number of
ASSIGNMENT_DETAILS(including 0)
Examples:
addm m/CS2103T l/I3-AUDI Friday 16:00 - 18:00 lz/https://nus-sg.zoom.us/CS2103T_lecture t/COM1 B1-103 Wednesday 12:00 - 13:00 tz/https://nus-sg.zoom.us/CS2103T_tutorial a/Independent Project a/Team Projectaddm l/Every Monday t/Every Tuesday m/CS1231Saddm m/CS2030S
Editing a module: editm
Edits an existing module in the module list.
Format: editm INDEX [m/MODULE_CODE] [l/LECTURE_DETAILS] [t/TUTORIAL_DETAILS] [lz/LECTURE_ZOOM_LINK] [tz/TUTORIAL_ZOOM_LINK] [a/ASSIGNMENT_DETAILS]…
- Edits the module at the specified
INDEX. The index refers to the index number shown in the displayed module list. The index must be a positive integer 1, 2, 3, … - At least one of the optional fields must be provided.
- Existing values will be updated to the input values.
- When editing assignment details, the existing assignment details of the module will be removed i.e. adding of assignment details are not cumulative.
- You can remove all the module’s assignment details by typing
a/without specifying any assignment details after it.
Examples:
-
editm 1 l/Every Friday a/Functional ExpressionismEdits the lecture details and assignment details of the 1st module to beEvery FridayandFunctional Expressionismrespectively. -
editm 2 m/MA1521 a/Edits the module code of the 2nd module to beMA1521and clears all existing assignment details.
Deleting a module: deletem
Deletes the specified module from the module list.
Format: deletem MODULE_INDEX
- Deletes the contact at the specified
MODULE_INDEX. - The module index refers to the index number shown in the displayed module list.
- The index must be a positive integer 1, 2, 3, …
Examples:
-
listfollowed bydeletem 2deletes the 2nd module in the module list. -
find CS2030Sfollowed bydeletem 1deletes moduleCS2030S.
Finding a module: findm
Finds modules with any of the given keywords in any field.
Format: findm KEYWORD [MORE_KEYWORD]…
- The search is NOT case-sensitive; e.g.
find cs2030swill return the moduleCS2030S, orCs2030s. - The order of the keywords does not matter; e.g.
find cs2100 cs2109swill return modulescs2109sandcs2100. - Any field associated with the module can be found using this command.
- Only full words will be matched; e.g.
find Cs2030will not return moduleCs2030S. - Full words are characterized by having an empty space before and after the word; e.g. Searching
Fridaywill only matchFridayand notFriday, - Modules matching at least one keyword will be returned (i.e.
ORsearch); e.g.cs2109s cs2100will return modulesCS2109sandCS2100.
Examples:
-
findm CS2040Sreturns modulecs2040s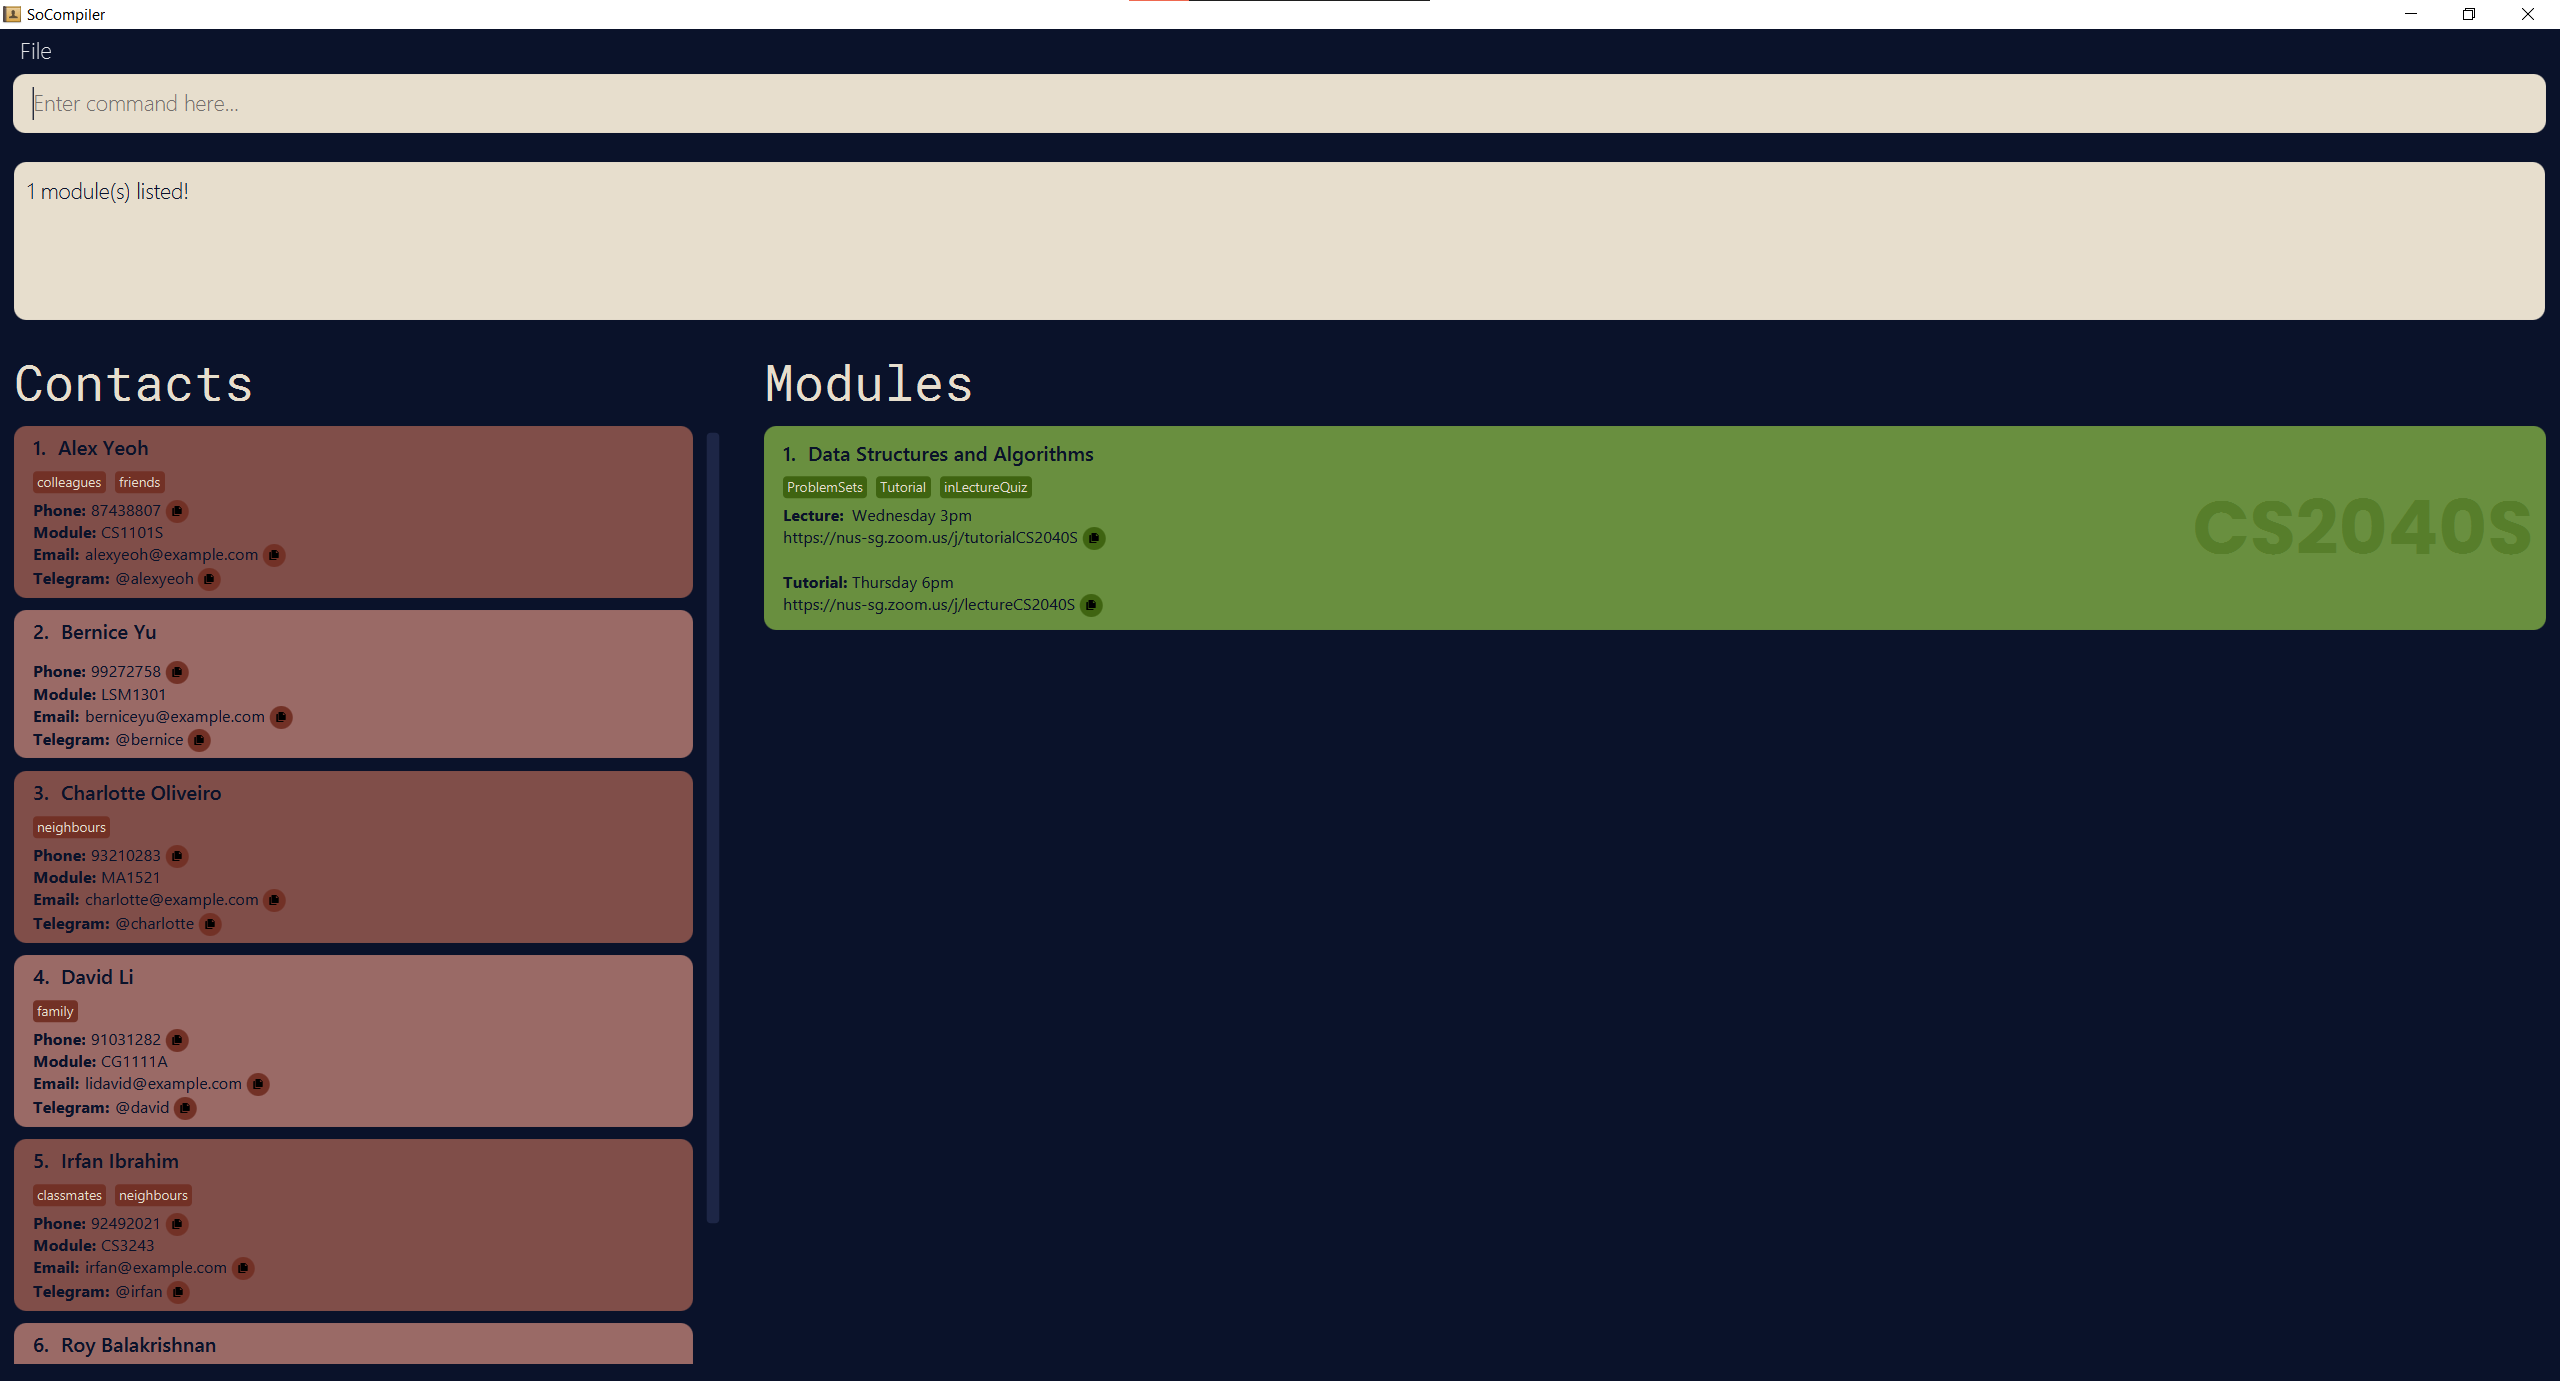
-
findm Fridayreturns modulesCS2101andCS2103T, assuming both modules have lectures and/or tutorials on Friday.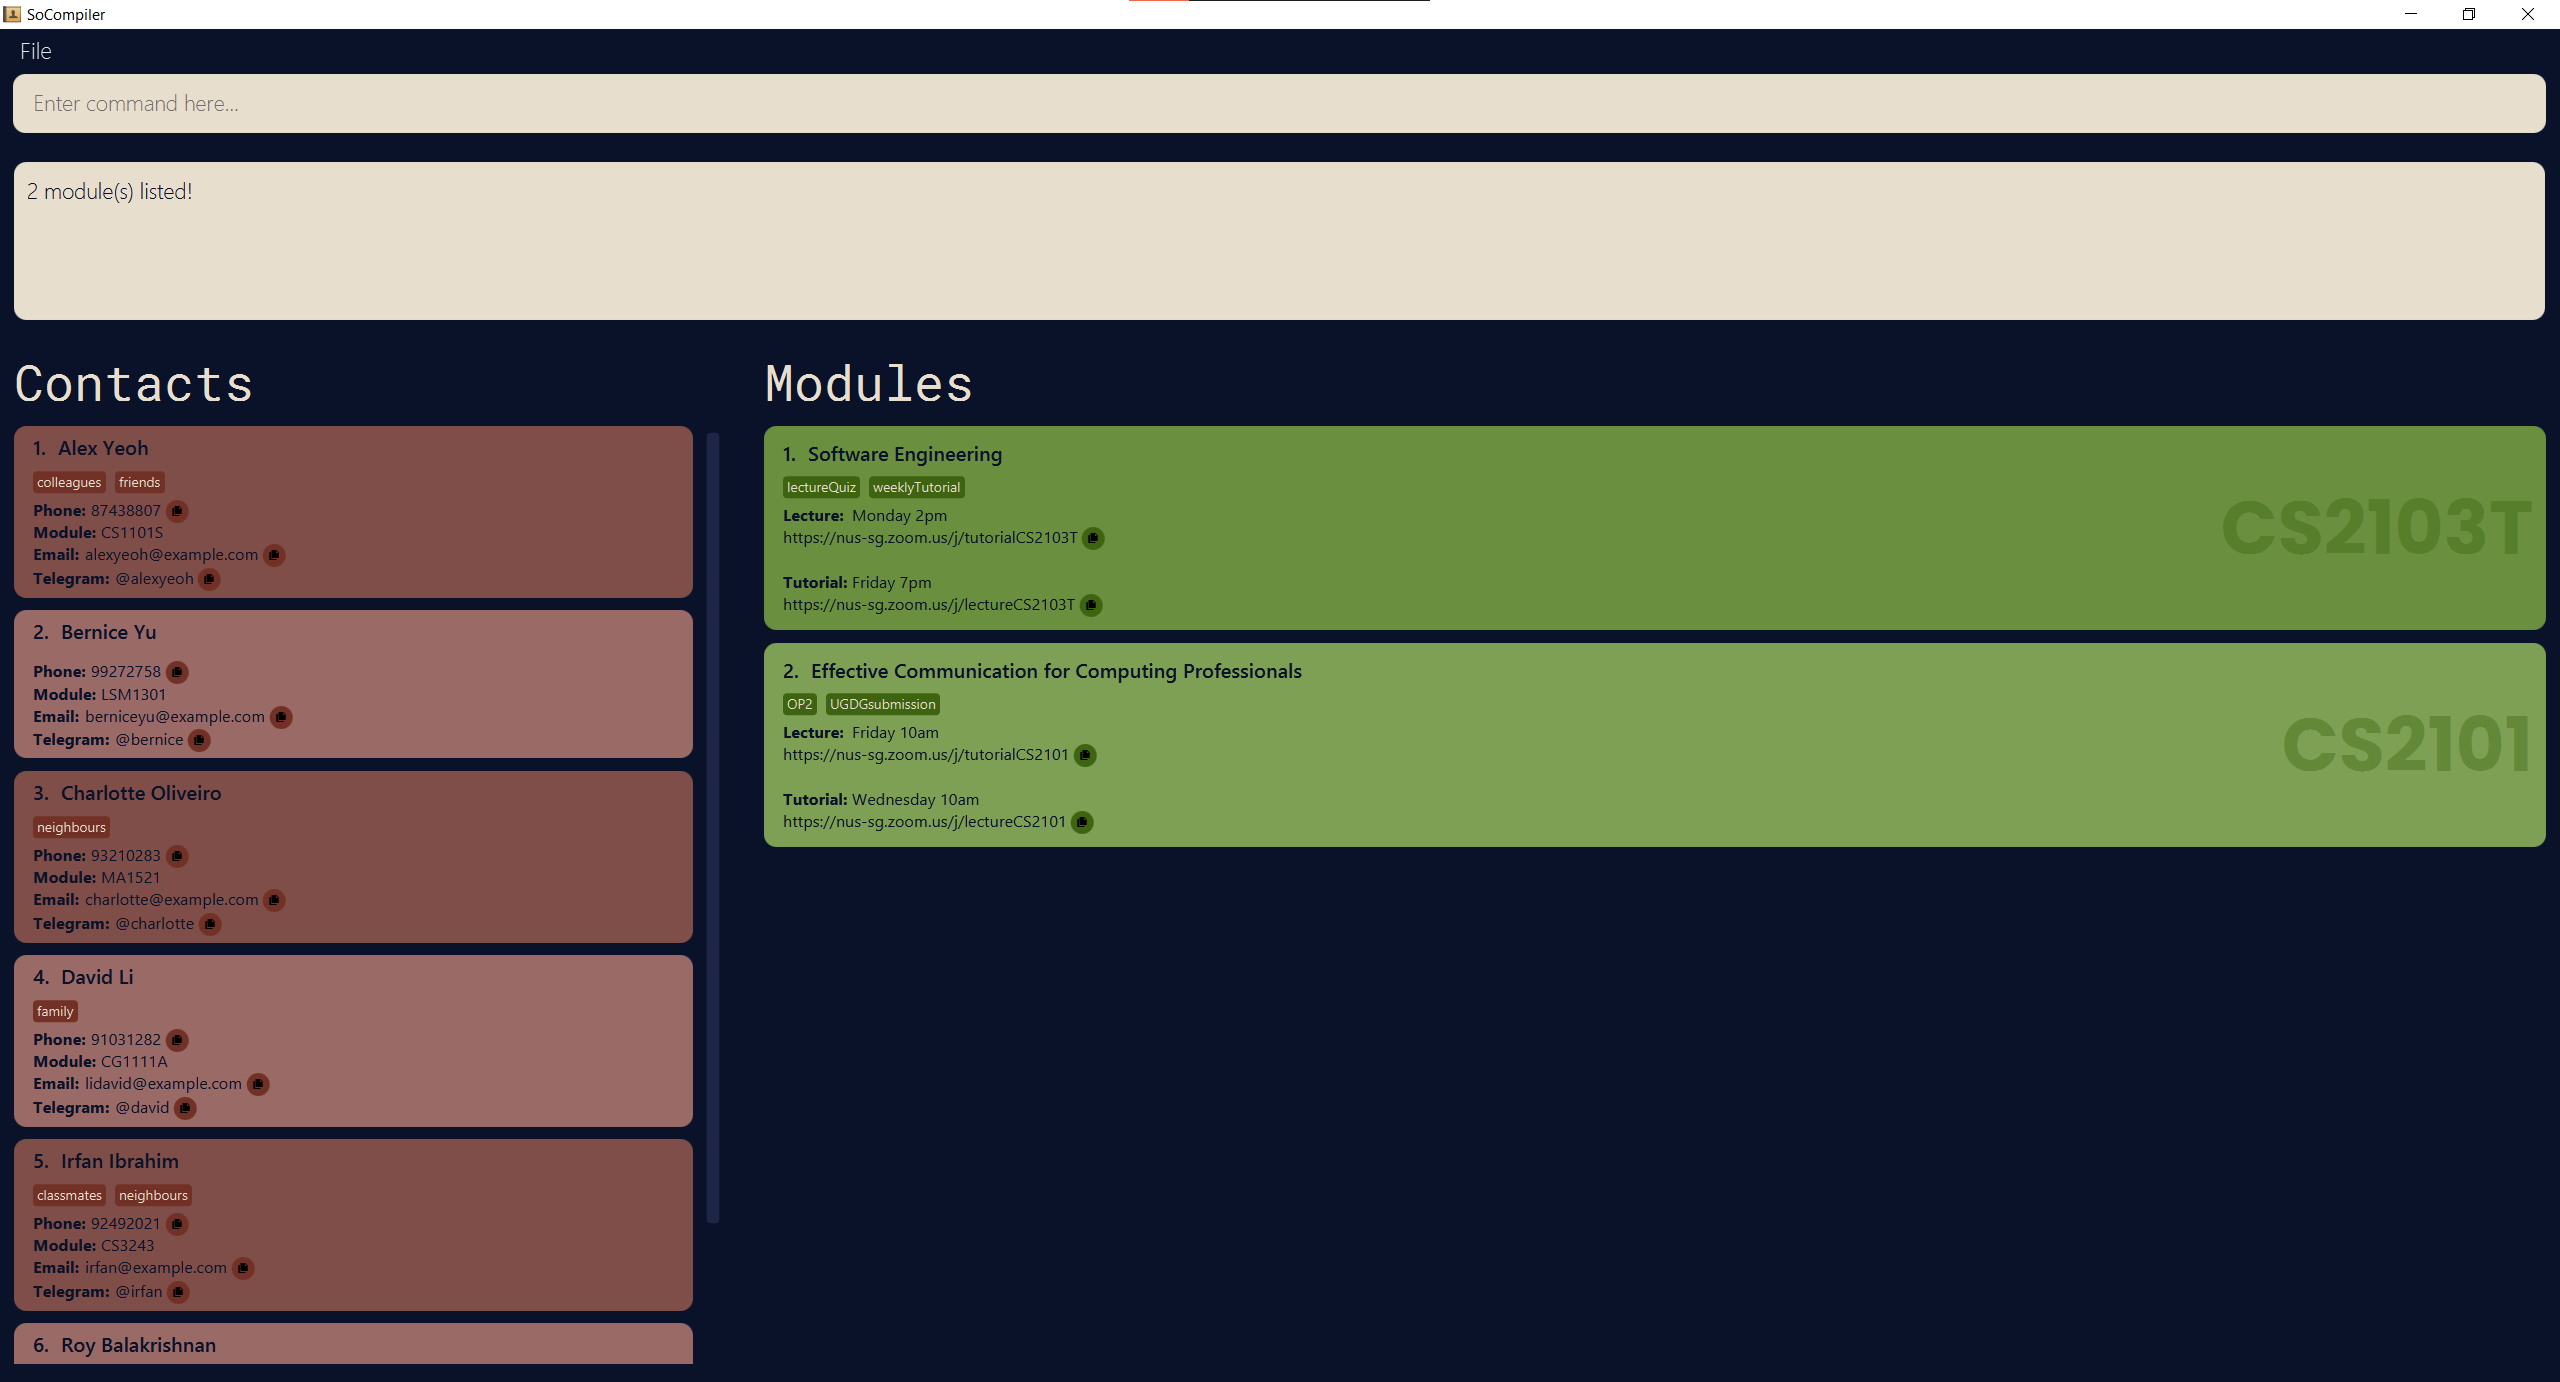
Field Details
Person Fields
| Field Type | Field Description | Identifier | Optional | Restrictions (if any) |
|---|---|---|---|---|
| Name | A person’s name | n/ | Should only contain alphanumeric characters | |
| Phone Number | A person’s phone number | p/ | ✓ | Should only contain numbers and be at least 3 digits long |
| Module Code | The module code a person is associated to | m/ | ✓ | |
| Email Address | A person’s email address | e/ | ✓ | Should follow the format local-part@domain, where:1. local-part should:only contain alphanumeric characters and the following characters: + _ . - .2. domain consists of two domain labels seperated by a .- The second domain label should be at least 2 characters long.- domain label should start and end with alphanumeric characters.- Each domain label should only consist of alphanumeric characters, separated by hyphens if necessary. |
| Telegram Handle | A person’s telegram | tg/ | ✓ | 1. Should begin with @ and contain only alphanumeric characters and underscores2. Should be at least 5 characters long, excluding the @
|
| Tags | A person’s tag | t/ | ✓ |
Module Fields
| Field Type | Field Description | Identifier | Optional | Restrictions (if any) |
|---|---|---|---|---|
| Module Code | Module code of a module | m/ | Must be a valid NUS module | |
| Lecture Details | Details of a lecture, e.g. location and time | l/ | ✓ | |
| Lecture Zoom Link | Zoom link of a lecture | lz/ | ✓ | Must be a valid URL which begins with https:// |
| Tutorial Details | Details of a tutorial, e.g. location and time | t/ | ✓ | |
| Tutorial Zoom Link | Zoom link of a tutorial | tz/ | ✓ | Must be a valid URL which begins with https:// |
| Assignment Details | Details of an assignment, e.g. title and due date | a/ | ✓ | Should only contain alphanumeric characters and spaces. |
Command summary
| Command | Module/Contact | Format | |
|---|---|---|---|
| addm | Module | addm m/MODULE_CODE [l/LECTURE_DETAILS] [t/TUTORIAL_DETAILS] [lz/LECTURE_ZOOM_LINK] [tz/TUTORIAL_ZOOM_LINK] [a/ASSIGNMENT_DETAILS]… |
|
| addp | Contact | addp n/NAME [p/PHONE_NUMBER] [e/EMAIL] [m/MODULE_CODE] [t/TAG]… |
|
| editm | Module | editm INDEX [m/MODULE_CODE] [l/LECTURE_DETAILS] [t/TUTORIAL_DETAILS] [lz/LECTURE_ZOOM_LINK] [tz/TUTORIAL_ZOOM_LINK] [a/ASSIGNMENT_DETAILS]… |
|
| editp | Contact | editp INDEX [n/NAME] [p/PHONE] [e/EMAIL] [m/MODULE_CODE] [t/TAG]… |
|
| deletem | Module | deletem MODULE_INDEX |
|
| deletep | Contact | deletep CONTACT_INDEX |
|
| findm | Module | findm KEYWORD [MORE_KEYWORD]… |
|
| findp | Contact | findp KEYWORD [MORE_KEYWORD]… |
|
| clear | Both | clear |
|
| list | Both | list |
|
| find | Both | find KEYWORD [MORE_KEYWORDS] |
|
| exit | General | exit |
|
| help | General | help |
FAQ
Q: How do I transfer my data to another Computer?
A:
- Install the app in the other computer.
- Go to the location where your current app is in, there should be a file called
datain the same location. - Copy the entire file and either email yourself the file or use a thumb-drive to transfer it to the other computer.
- Move the copied file to the same location you placed the jar file in the new computer.
Q: What if my module has no zoom links? What if I don’t have the contact number of my Teaching Assistant?
A: When adding a Module, all fields except MODULE_CODE are optional. When adding a contact, all fields except
NAME are optional. These fields can be updated later with the
editp or editm commands.
Q: What if I have friends with the same name?
A: SoCompiler currently does not support duplicate names. If there are multiple contacts with the same first name, you may add use their full name or a nickname.
Q: Why can I not add a phone number with its country code?
A: SoCompiler is currently optimised for SOC students, and thus we assume that everyone will have Singapore numbers. If you wish to add a foreign number, you can add it in without the + in front.
Q: Why can I add duplicate information(phone numbers, telegram handles, email addresses) to different people?
A: We do not wish to restrict your freedom by restricting those fields. Do check that the information you input is accurate.
GLOSSARY
Command Line Interface (CLI)
- It is an interface where users input text commands to interact with the computer/program.
Graphical User Interface (GUI)
- It is an interface where users can interact with apps/electrical devices through graphical icons and audio indicators.
Jar file
- It is typically used to deploy(run) an application.
- For our app, it is the file used to launch the application.
Parameters
- It is a variable used in a command to refer to data provided.
- For our app, it refers to the different data fields in command. For example
NAMEinn/NAMEis a parameter which is to be replaced by a value.
Alphanumeric
- It refers to the combined set of the 26 alphabetic characters 10 Arabic numerals.
- Alphabetic characters include both lower and upper case letters, a to z & A to Z.
- Arabic numerals refer to the digits 0 to 9.
URL
- It refers to the address of a web page.
- Example: https://google.com
School of Computing (SOC)
- It refers to the School of Computing from the National University of Singapore.
Thank you for reading our SoCompiler User Guide!